Why the Percolator Coffee Pot Is Making a Comeback
If you grew up around coffee lovers or classic kitchen gear, you’ve probably seen a percolator coffee pot lurking on the stovetop or camping shelf. It’s one of the oldest and most iconic coffee brewing devices—part nostalgia, part ritual, and all about that rich, bold cup of joe.
But what exactly is a coffee percolator? How does it work? And why are some coffee aficionados still raving about it while others have moved on to fancy espresso machines and sleek drip brewers?
Let’s take a deep dive into the world of coffee percolators—the clunky yet charming contraptions that have brewed millions of cups since the 1800s.
A Brief History of the Percolator
Coffee percolators date back to the 19th century, with the earliest patent granted in 1819 to an American named Samuel Barber. It became wildly popular in the early 20th century, especially in American homes and diners.
Before electric drip machines took over in the 1970s, percolators were the go-to coffee makers for decades. Their rugged design made them favorites for campers, RV travelers, and anyone who wanted hot coffee without fancy gadgets.
What Is a Coffee Percolator?
At its core, a coffee percolator is a type of manual or electric coffee brewer that uses gravity and boiling water to extract coffee. It works by cycling hot water repeatedly through a bed of coffee grounds until the brew reaches the desired strength. No filters. No pumps. Just simple engineering that’s been caffeinating households (and campgrounds) since the 1800s.
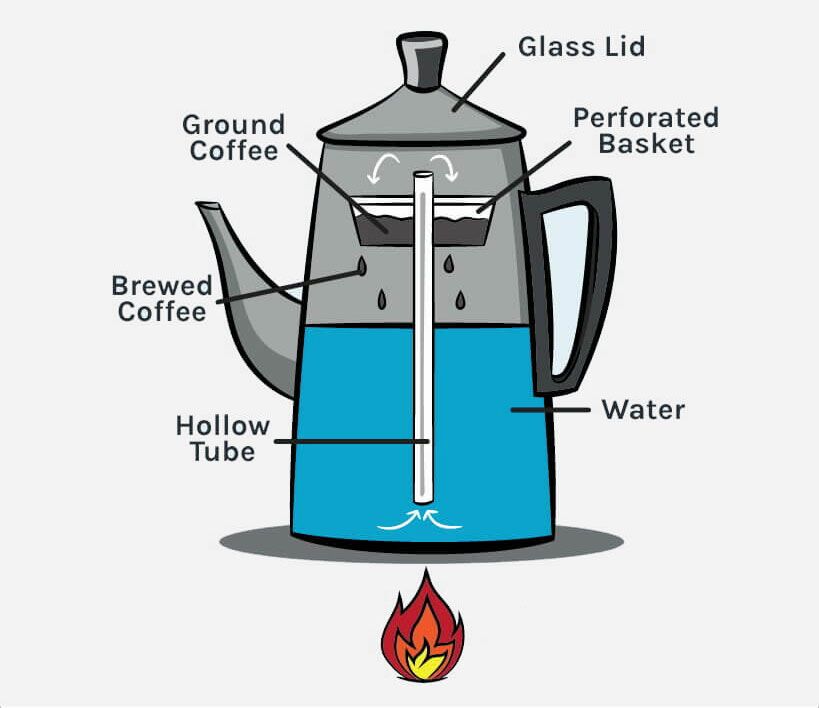
The Anatomy of a Percolator
Most percolators, whether stovetop or electric, follow the same basic blueprint:
- Bottom Chamber – This is where you pour the water. Once heated, it creates the steam and pressure to get the magic going.
- Perforated Metal Basket – Holds your ground coffee above the water. It's like the filter—but old-school and reusable.
- Central Tube (Perk Tube) – A hollow metal stem that carries boiling water from the bottom to the top.
- Top Lid with a Glass or Plastic Knob – That little “bubble viewer” lets you watch the brewing action. Think of it as your coffee percolation theater.
How Does a Coffee Percolator Work?
Here’s the fun part: once you heat the percolator, water starts to boil in the bottom chamber. The steam pressure pushes that hot water up through the center tube, where it’s sprayed over the coffee grounds in the metal basket. Gravity takes over, and the now coffee-infused water drips back down into the lower chamber.
Then it does it again. And again. And again.
Each cycle extracts more flavor—and more caffeine—from the grounds. The longer it perks, the stronger the coffee gets.
This loop continues until the heat is turned off (or the electric percolator clicks off automatically), and you’re left with a pot of bold, piping-hot brew.
The Percolation Process: Step by Step
1. Water Goes in the Bottom Chamber
You start by filling the base of the percolator (aka the water reservoir) with cold, fresh water. The amount depends on how many cups you want to make—most percolators have markings to help you measure.
2. Coffee Grounds Go in the Filter Basket
Next, you add your ground coffee to the metal basket that sits above the water. It’s important to use a coarse grind—anything too fine can sneak through the holes or clog the system. No paper filters here; the basket does it all.
3. Heat Source Starts the Brew
When the percolator is placed on a stove (or plugged in, if electric), the water in the bottom begins to heat up. As it reaches boiling point, the pressure causes the water to rise up through the central vertical tube—think of it as the coffee elevator.
4. Hot Water Sprays Over the Coffee Grounds
That boiling water bursts out the top of the tube and sprays over the coffee grounds in the basket. The hot water extracts the coffee’s flavors, oils, and aroma as it drips through the grounds.
5. Brewed Coffee Drips Back Down
Gravity pulls the now coffee-infused water back down into the bottom chamber, where it mixes with the remaining water.
6. Repeat the Cycle (a.k.a. Percolating)
Here’s where it gets interesting: the same water continues to cycle through the grounds multiple times—each loop pulling out more flavor and body.
It’s like flavor layering—each pass makes the coffee stronger, bolder, and richer.
7. You Stop the Brewing (Before It Gets Too Intense)
Percolators don’t know when to stop—you do. You’ll hear a soft bubbling or “perking” sound that tells you it’s working. Once the coffee reaches your preferred strength, remove it from the heat (or the electric version will automatically shut off).
The Key Difference: Continuous Brewing
Unlike drip coffee makers, which run water through the grounds once, a percolator recirculates the same water through the coffee grounds over and over. This creates a much stronger and darker cup—some might say it borders on rocket fuel if you let it perk too long.
Too short? You get weak, under-extracted coffee.
Too long? You get bitter, over-extracted coffee.
Just right? You get a rich, satisfying cup that hits like classic diner coffee—with character.
The Science-y Bit (Without the Boredom)
Percolators rely on thermosiphon action—a fancy term for how water moves when heated:
- When water heats up, it becomes less dense and rises.
- The percolator’s central tube gives the hot water an escape route—straight to the top.
- As it cools and mixes with coffee grounds, it becomes denser and drips back down.
- This creates a natural circulation loop—no pump, no motor, just good ol’ physics.
Kind of brilliant, right?
What’s That Sound? (Listening for the "Perk")
The hallmark of a brewing percolator is the gentle, rhythmic “perk… perk… perk…” sound. That’s the hot water bubbling up the tube and splashing over the coffee grounds.
If it starts to sound more like angry bubbling or hissing, your heat’s probably too high.
Pro tip: The sound of percolation is your brewing timer. The longer it perks, the stronger the coffee.
Stovetop vs. Electric Percolators: Which One’s Right for You?
If you’ve made it this far into the wonderful world of percolated coffee, you might be wondering:
“Should I get a stovetop or an electric percolator?”
Great question. Both types brew coffee using the same basic percolation method, but they differ in convenience, control, and ideal use cases.
Let’s break it down so you can choose the percolator that fits your lifestyle—and your brewing vibe.
Stovetop Percolators: Rugged, Hands-On Brewing
How They Work:
A stovetop percolator is the original old-school brewer. You fill it with water and coffee grounds, place it on a heat source (like a gas burner, induction stove, or campfire), and manually control the brewing process.
Pros:
- Perfect for camping or off-grid brewing – No electricity required.
- More control – You manage the heat and brew time exactly how you like.
- Durable and long-lasting – Most are made from stainless steel or aluminum.
- Classic aesthetic – Let’s face it, they look charming on a stovetop.
Cons:
- No auto shutoff – You have to pay attention or risk overbrewing.
- Learning curve – It can take a few tries to get the timing and temperature just right.
- More hands-on – Great for purists, less ideal for multitaskers.
Best for: Campers, traditionalists, DIY brewers, and anyone who enjoys the ritual of making coffee manually.
Our picks:
Farberware Classic Yosemite Stainless Steel Coffee Percolator (from $33)
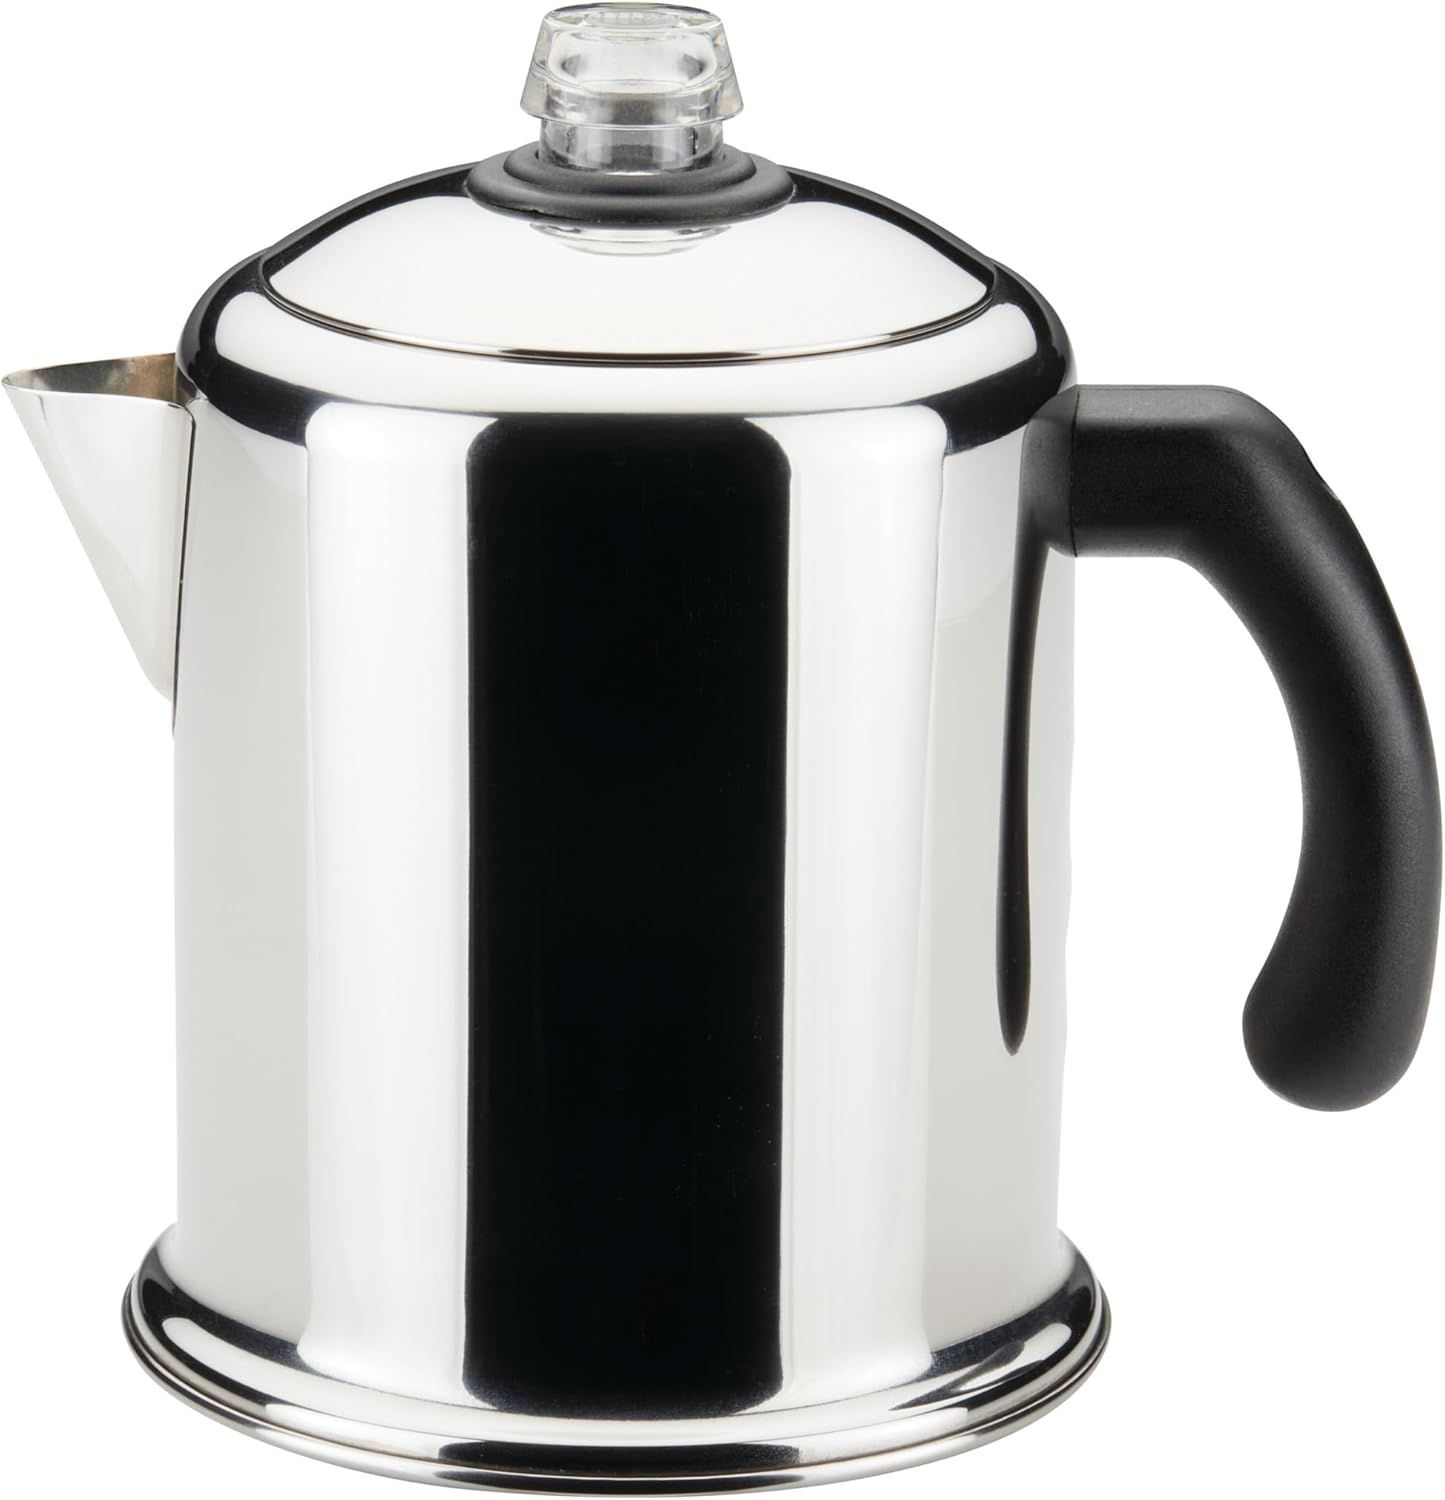
The Farberware Classic Yosemite percolator is not a luxury gadget with fancy programming or an auto shut‑off. It’s more of a faithful workhorse: simple, reliable, built tough. If you’re willing to manage heat and timing (as with all percolators), you can get delicious, satisfying cups with character.
Key Specs & Usage Tips
- Best grind: Coarse grind, because fine grind can clog or cause gritty sediment.
- Heat control: Start with medium‑high to bring water to boil, then reduce heat once perking starts to avoid harsh taste.
- Brewing time: Often 5‑7 minutes of percolating once the boiling/perking begins for smaller batches. Larger batches take more time.
- Water quality: Use fresh, clean water to avoid off tastes, since stainless steel won’t correct bad water flavor. Non‑reactive metal interior helps.
Coleman Stainless Steel Coffee Percolator, 12-Cup Capacity (from $59)
Performance & Tips
- Best Usage Volume: For best results without overflow or bitterness, many users recommend filling to around 9‑10 “cups” worth (not the full 12) and using a medium‑coarse grind.
- Heat Control: Begin with medium‑high heat to bring water to percolation. Once brewing starts, reduce heat to maintain gentle perking without burning.
- Cleaning: Rinse immediately after use. Detachable parts make cleaning easier. Avoid abrasive scrubbers to preserve the finish.
- Transport / Outdoor Use: While built for rugged use, the glass knob is a weak point in transport. Packing it carefully helps. Also, when brewing over uneven flames or campfires, watch for hot spots that may scorch.
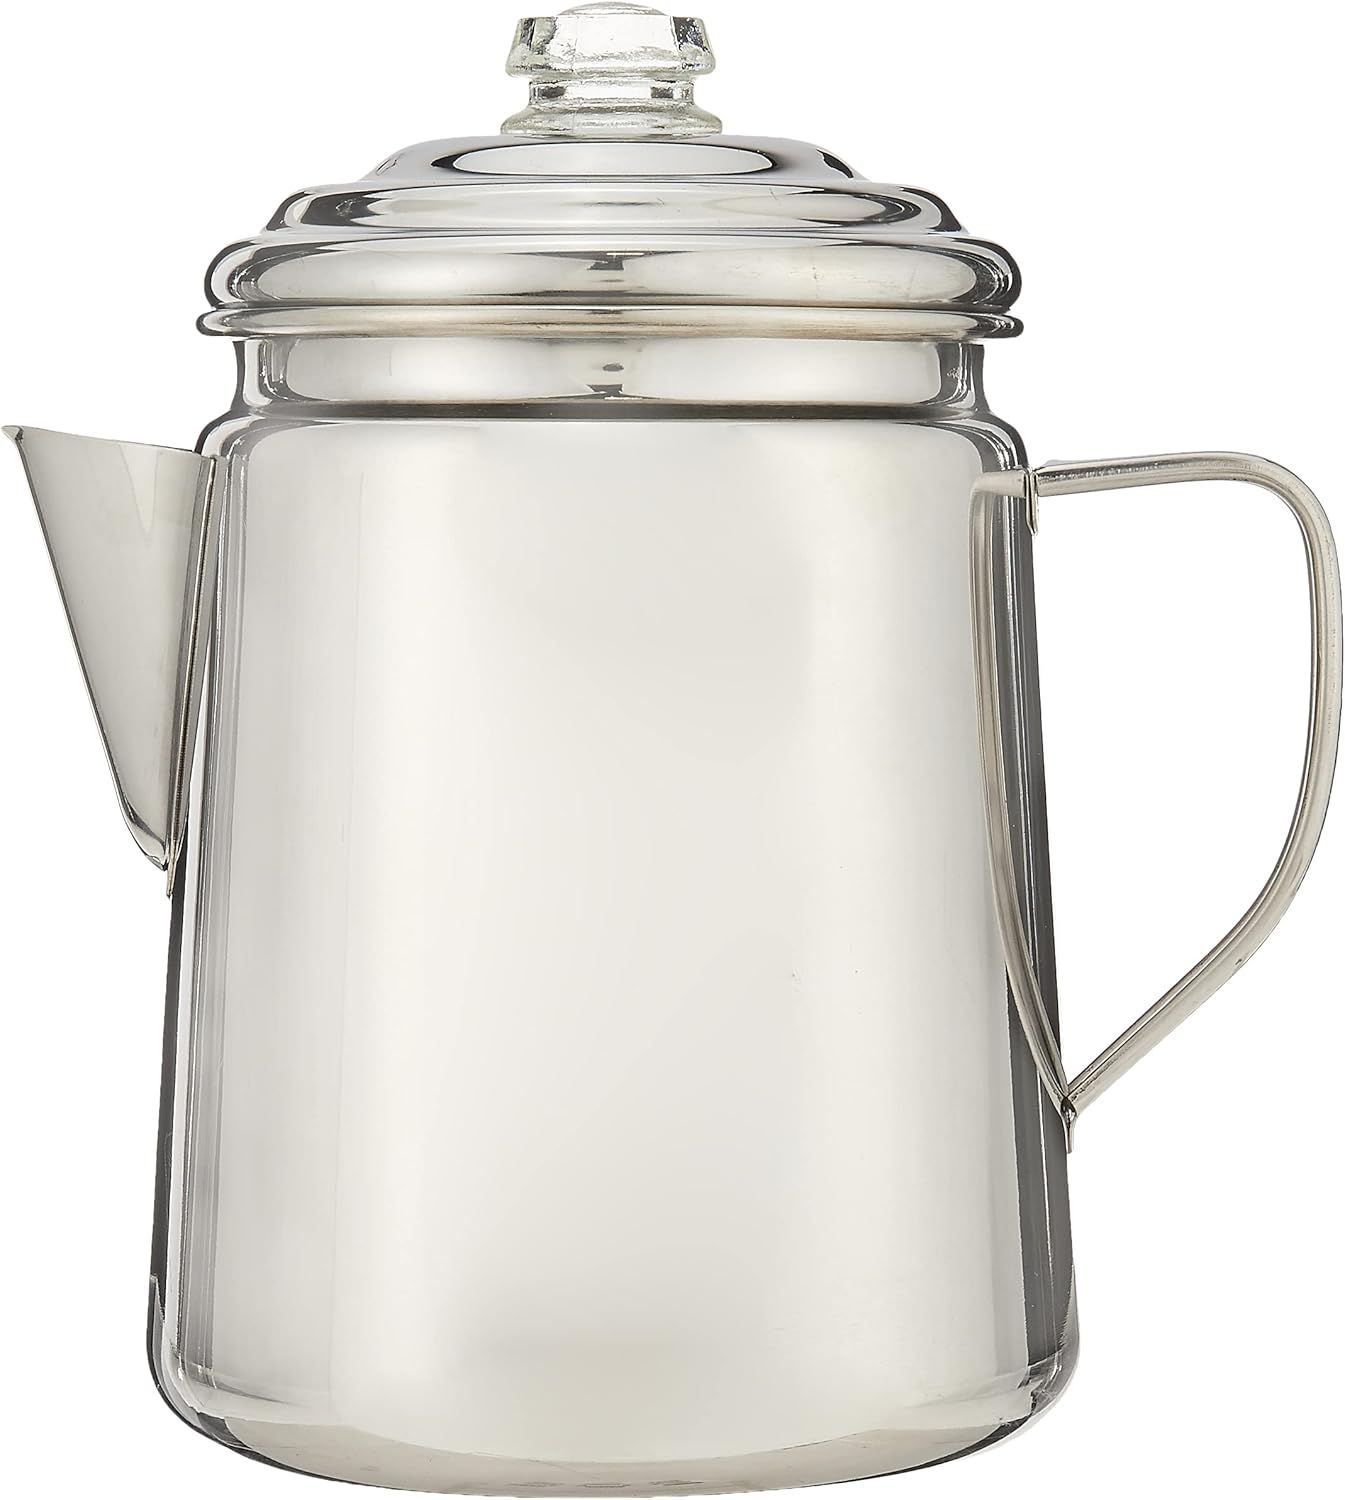
COLETTI Bozeman Percolator Coffee Pot (from $44)
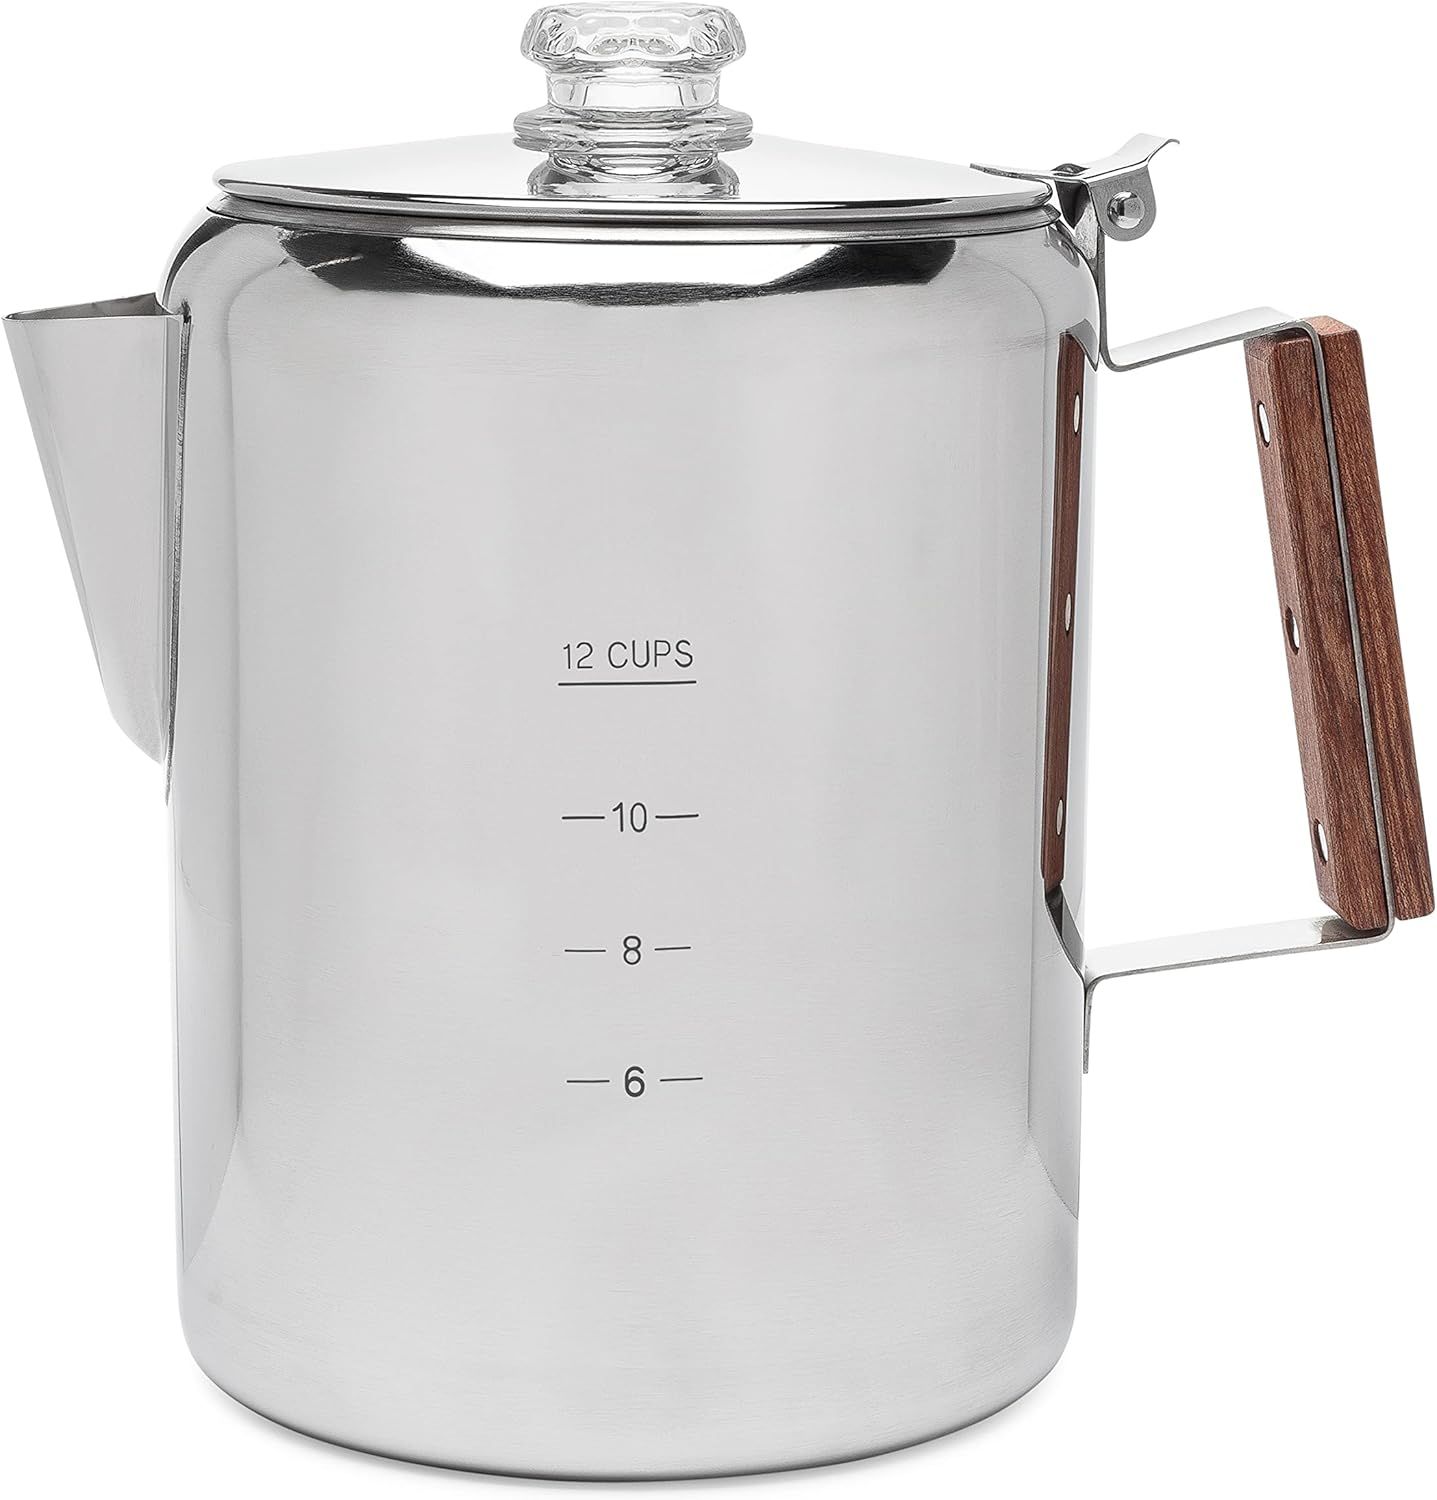
Performance & Tips
- Best water / fill level: Don’t fill to nominal “cup” maximum; leave some room. Many users stick to ~5‑6 US‑cup volumes (or whatever amount doesn’t reach spout holes).
- Grind size: Coarse grind works better. Fine grounds tend to overflow or passthrough the basket. Use a grind between French press and typical drip coarse.
- Brewing time: After percolation begins (water starts splashing into glass lid knob), let it run about 5‑7 minutes on medium‑low heat for smaller fills. Longer if you have more water but watch for bitterness.
- Heat control: Start with medium or medium‑high to bring to perking, then lower heat so the percolation is gentle—not boiling violently. This helps avoid burnt or overly bitter taste.
- Cleaning care: Regular rinse after use; clean filter basket, tube. Avoid harsh dish detergent or steel wool inside. The included filters can help reduce oils / grounds and make clean‑ups easier.
At a glance comparison table
| Feature | Farberware Classic Yosemite | Coleman Stainless Steel 12‑Cup | COLETTI Bozeman Percolator |
| Advertised Capacity | 8 cups (also available in 12‑cup) | 12 cups | 9 cups (also 12‑cup version) |
| Body Material | Heavy gauge stainless steel, mirror finish | Stainless steel | 18/8 stainless steel |
| Filter / Basket | Permanent metal filter basket | Metal filter basket | Metal filter basket + optional paper/medical filters included |
| Viewing Knob / Lid | Clear knob (glass or clear plastic) to view percolation | Glass “bubble” knob | Glass knob (to see perking) |
| Handle Type / Insulation | Metal handle (may heat under strong heat) | Side handle (not insulated) | Rosewood (or wood) handle for cooler grip |
| Ideal Use / Strengths | Good middle ground: home use, reliable | Large batches, outdoor / group brewing | Stylish, durable, good for camping & design-conscious brewing |
| Common Weaknesses | Handle may heat up; knob fragility; not always induction-friendly | Handle can get hot; overstated capacity; knob fragility; no internal level markings | Overstated capacity; fragile knob; requires careful brew control; possible basket overflow |
| Typical Brew Notes | Strong, robust, full-bodied coffee | Bold, robust for large servings | Clean, bold, no metallic taste (due to full stainless) |
| Best for | Someone wanting a balance of capacity and usability | Groups, outdoor use, larger households | Coffee lovers who brew moderate batches and appreciate aesthetics |
| Temperature / Heat Control Sensitivity | Moderate — needs careful heat once perking | High — large volume means heating/over-extraction risk | Moderately high — needs balanced heat, careful monitoring |
Electric Percolators: Set It, Perk It, Pour It
How They Work:
An electric percolator plugs into a standard outlet and automates the brewing process. It uses a built-in heating element to bring water to a boil and usually features an automatic shutoff when brewing is complete.
Pros:
- Convenient and consistent – No need to hover over your coffee like it’s a science experiment.
- Auto shutoff – Prevents over-extraction and keeps coffee warm.
- User-friendly – Just add water and grounds, plug in, and wait for the magic.
- Perfect for daily home use – Great if you like strong coffee without babysitting a stovetop.
Cons:
- Less control over brewing – You can’t easily tweak temperature or timing.
- Needs electricity – Not ideal for camping or power outages.
- Bulkier – Electric models take up more counter space.
Best for: Busy mornings, office kitchens, beginners, and anyone who just wants great coffee with minimal effort.
Our picks:
Presto 02811 Stainless Steel Electric Coffee Percolator (from $76)
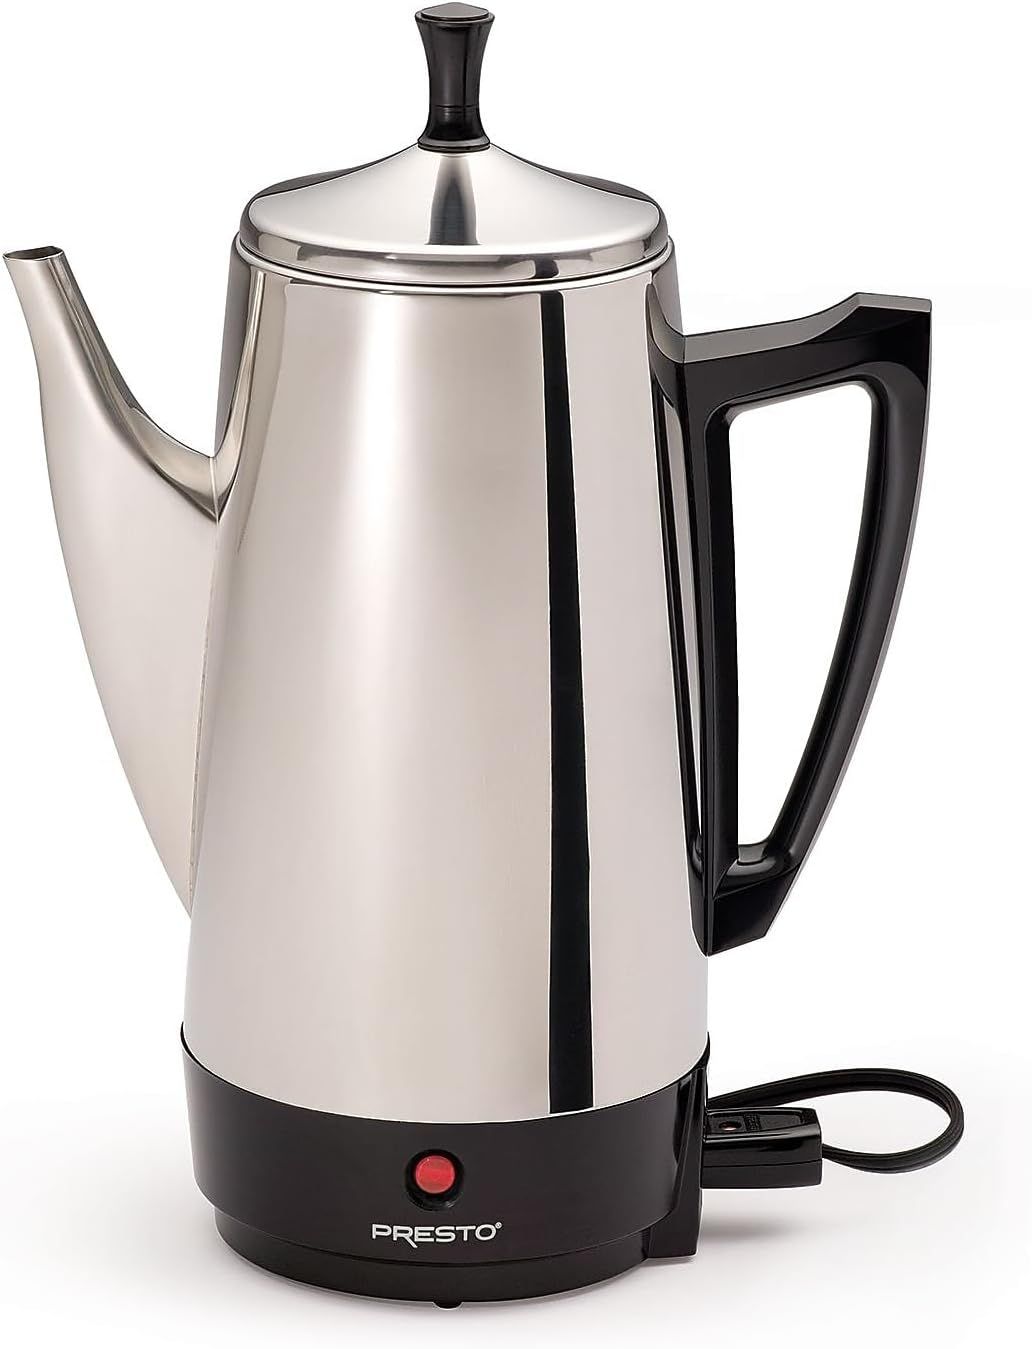
The Presto 02811 Stainless Steel Electric Percolator is a solid, well-designed workhorse. It blends traditional percolator brewing with modern conveniences—strong flavor, large capacity, durable construction—but also asks a little more involvement (watching brew, controlling for bitterness, handling heat).
Usage Tips
- Use a medium grind (coarser than drip, finer than French press) to avoid grounds slipping through filter and to reduce bitterness.
- Measure water and coffee carefully — overloading the basket will intensify brewing too much (leading to bitterness).
- Watch the signal light and transition to keep‑warm to avoid letting the pot keep percolating too long.
- Clean soon after use; rinse and dry well, especially interior parts, to prevent buildup of oils and stains.
- Use the detachable cord to set up in a convenient spot—near power outlet but safe from splashes.
Farberware Electric Coffee Percolator (from $50)
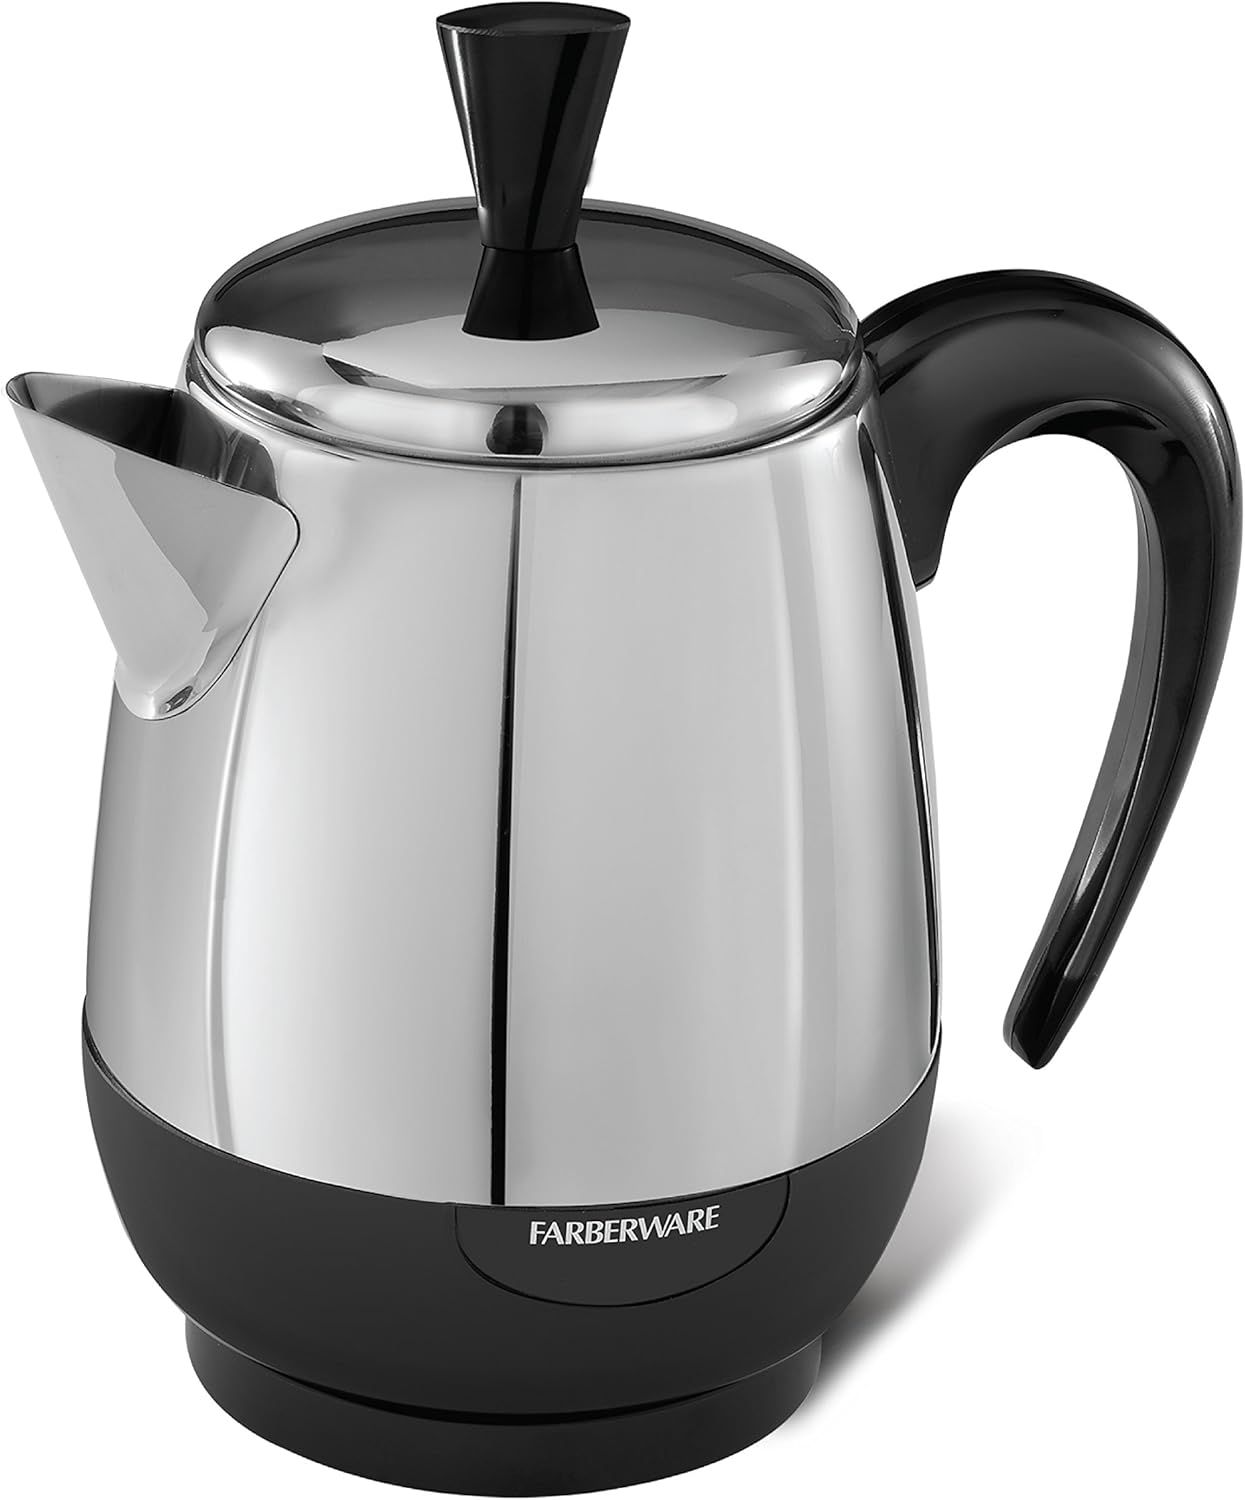
The Farberware Electric Coffee Percolator offers a blend of classic design and modern functionality. While it may require some manual oversight, its durable construction and efficient brewing make it a valuable addition to any coffee lover's kitchen.
Usage Tips
- Grind Size: Use a medium to coarse grind to prevent over-extraction and bitterness.
- Water Measurement: Be cautious when filling; overfilling can lead to spillage and underfilling may result in weak coffee.
- Cleaning: Regularly clean the percolator to maintain optimal performance and taste.
Moss & Stone Electric Coffee Percolator (from $55)
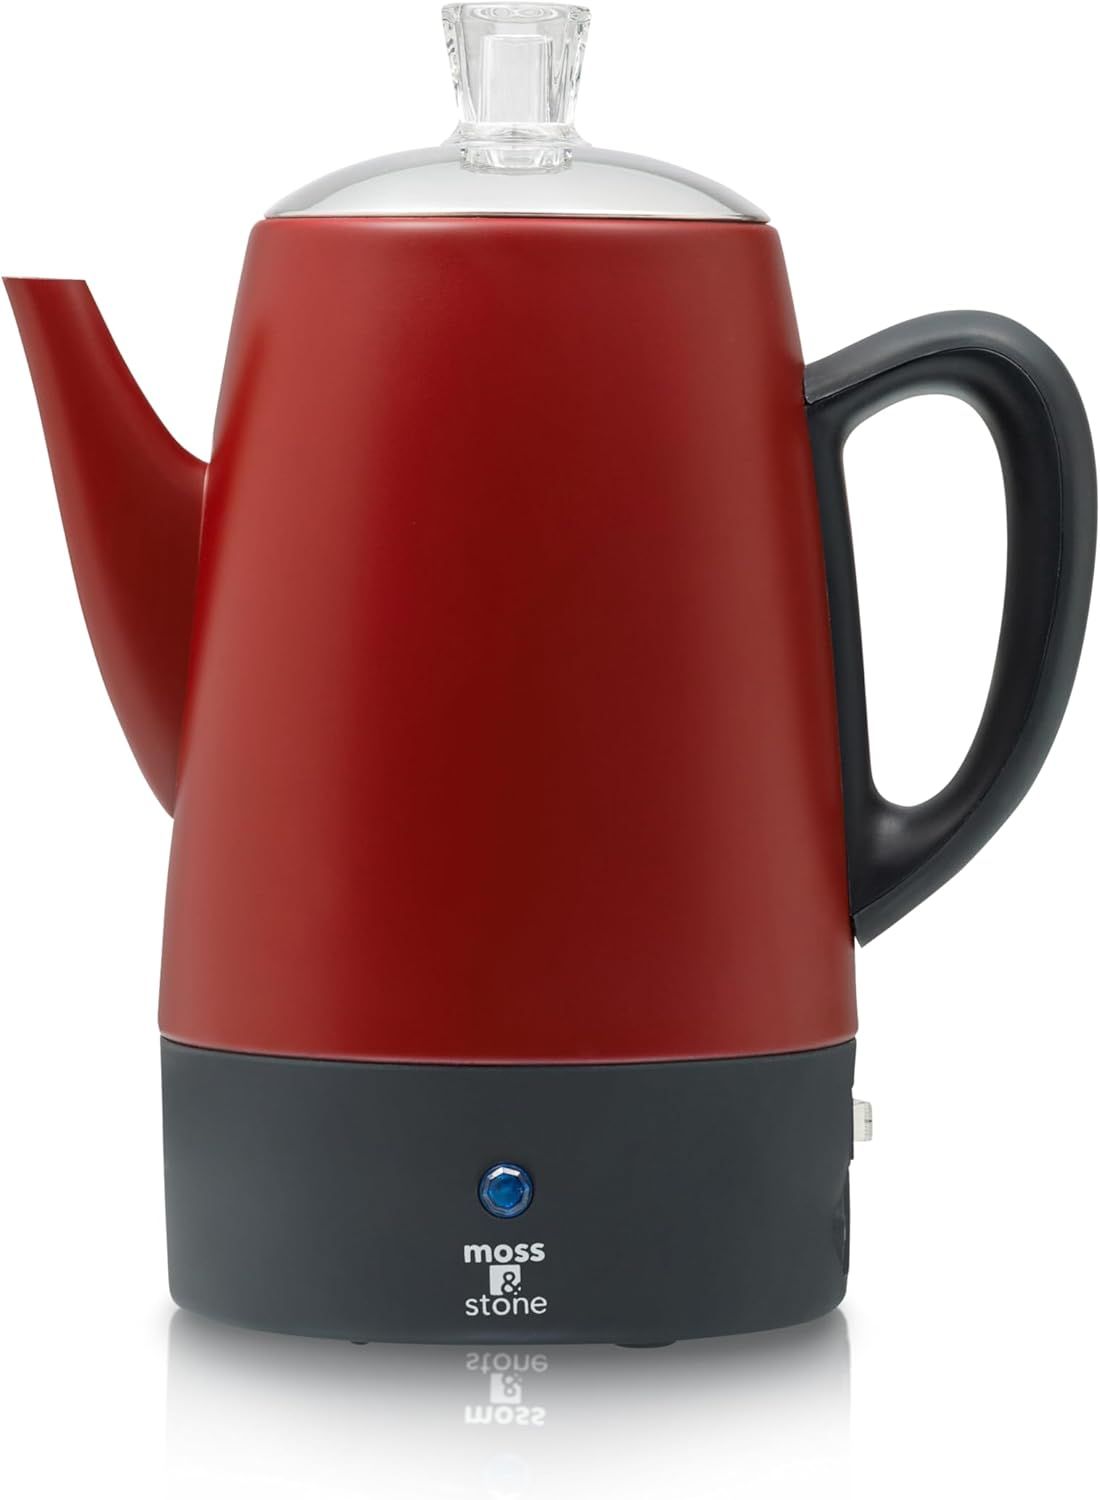
The Moss & Stone Electric Coffee Percolator offers a blend of style and functionality. While it may require some manual oversight and has a few limitations, its quick brewing time and elegant design make it a valuable addition to any coffee lover's kitchen. However, potential issues with the power cord and cleaning complexity should be
Usage Tips
- Grind Size: Use a medium to coarse grind to prevent over-extraction and bitterness.
- Water Measurement: Be cautious when filling; overfilling can lead to spillage and underfilling may result in weak coffee.
- Cleaning: Regularly clean the percolator to maintain optimal performance and taste.
At-a-Glance Comparison Table
| Feature | Presto 02811 Electric Percolator | Farberware Electric Percolator (FCP280) | Moss & Stone Electric Percolator |
| Capacity | 2–12 cups | 2–8 cups (FCP240), 12 cups (FCP412) | 10 cups |
| Material | Stainless Steel | Stainless Steel | Stainless Steel with Copper Finish |
| Keep Warm Function | Yes | Yes | Yes |
| Detachable Cord | Yes | Yes | Yes |
| Indicator Light | Yes | No | Yes |
| Cool-Touch Handle | Yes | Yes | Yes |
| Brewing Speed | ~1 cup per minute | ~1 cup per minute | ~8 minutes for 10 cups |
| Included Accessories | None | None | Double-walled borosilicate glass mugs |
| Design Style | Traditional | Classic | Modern with Color Options |
| Ease of Cleaning | Easy | Easy | Moderate |
| Price Range | Budget-Friendly | Mid-Range | Mid-Range |
Stovetop vs Electric Comparison Table
| Feature | Stovetop Percolator | Electric Percolator |
| Power Source | Stove, campfire | Electrical outlet |
| Ease of Use | Moderate – requires attention | Very easy – mostly hands-off |
| Portability | Highly portable | Less portable |
| Control Over Brew | High – manual heat and time | Low – automated cycle |
| Auto Shutoff | No | Yes |
| Best Use | Camping, off-grid, classic brew lovers | Daily home use, office, convenience |
Which One Should You Choose?
Still on the fence? Here’s a quick guide:
- Choose a stovetop percolator if:
- You like to control every step of the brewing process
- You enjoy traditional brewing methods or camping adventures
- You don’t mind listening for the “perk” and watching your pot like a hawk
- Choose an electric percolator if:
- You want consistent results with minimal effort
- You’re brewing for a family or office and need a set-it-and-forget-it option
- You’d rather sip than supervise
How to Make Great Coffee with a Percolator
Making percolator coffee is an art and a bit of a science. Here are some tips to get the best brew out of your percolator:
1. Use the Right Coffee Grind
Go for a medium-coarse to coarse grind—think somewhere between French press and drip grind. Too fine and your coffee will be bitter and muddy; too coarse and it’ll be weak.
2. Don’t Overfill the Coffee Basket
Use about 1 tablespoon of coffee grounds per cup of water as a starting point. You can adjust based on taste, but don’t overdo it.
3. Use Fresh, Cold Water
Start with fresh, cold water in the bottom chamber for a cleaner, brighter brew.
4. Heat Gently and Watch Closely
Put the percolator on medium heat. Once it starts percolating (you’ll hear a gentle “perk-perk” sound), reduce heat to maintain a steady cycle. Stop brewing after about 6–8 minutes to avoid bitterness.
5. Remove from Heat Before Serving
When you’re done, remove the pot from heat immediately to prevent over-extraction and enjoy your coffee while it’s fresh.
Percolator Coffee for Camping
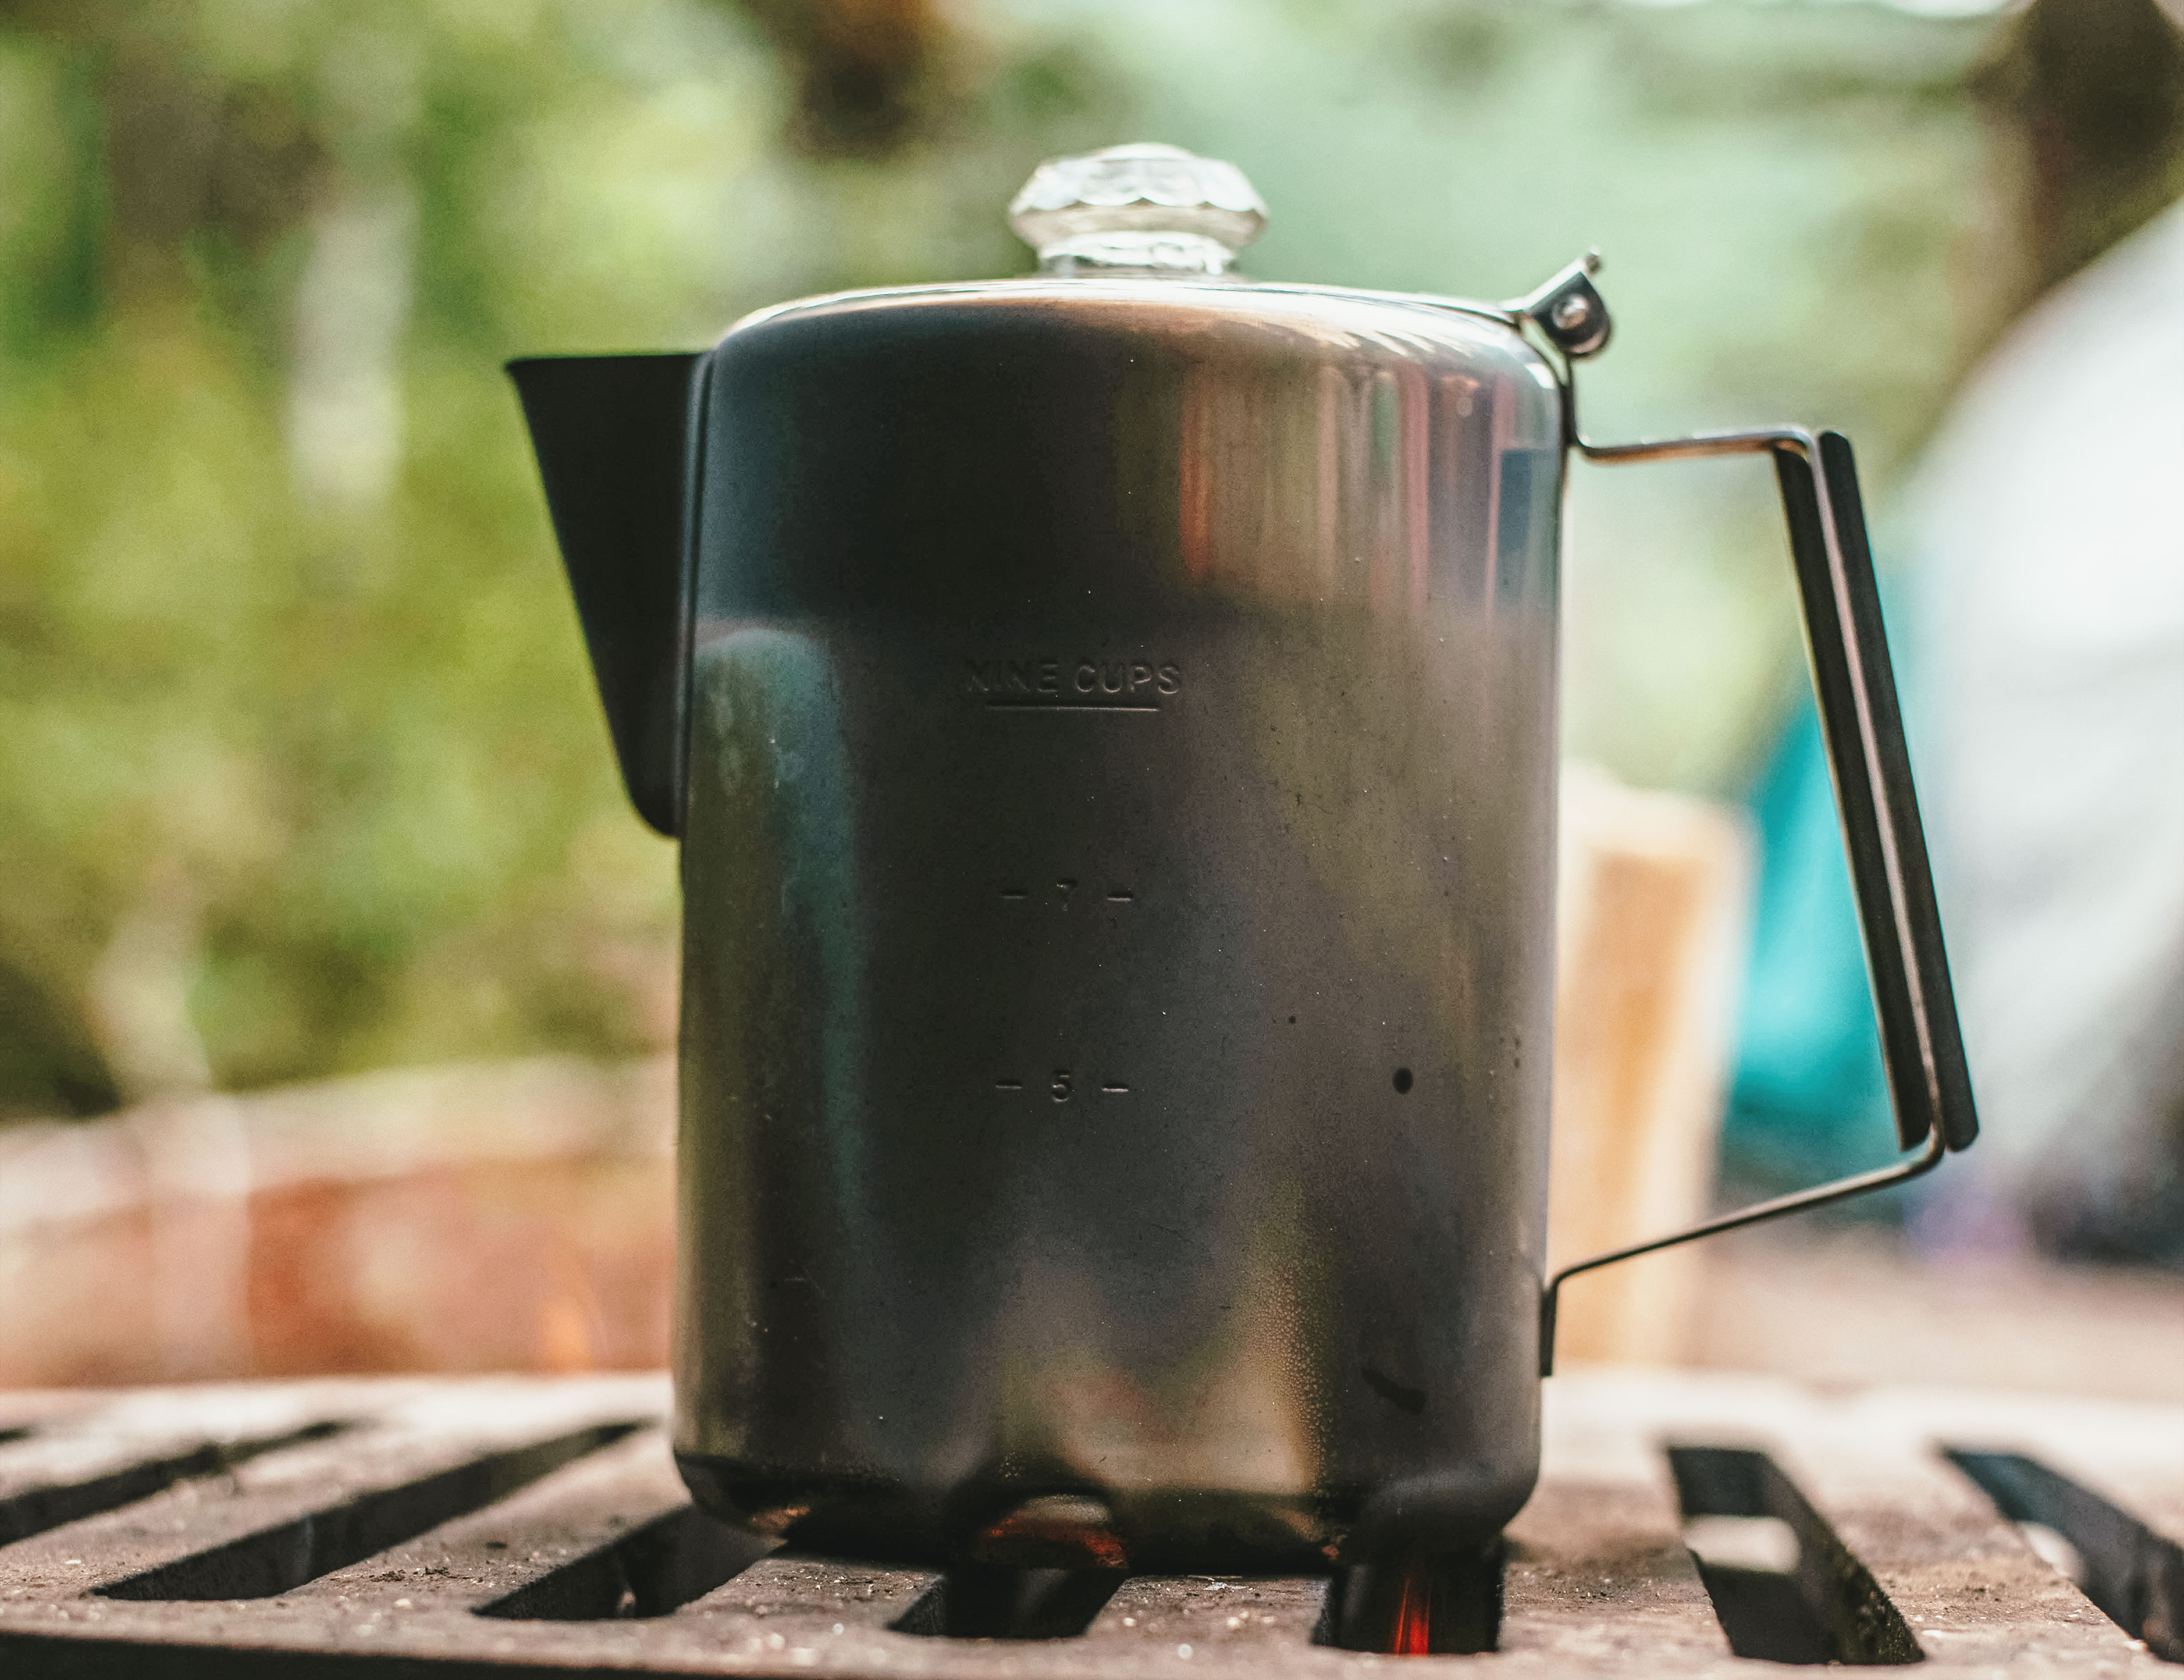
Camping and percolators go together like marshmallows and campfires — rustic, reliable, and oh-so-rewarding. Whether you're a seasoned backwoods barista or just learning to rough it with style, here’s everything you need to know about brewing percolator coffee under the open sky.
Why Percolators Are Perfect for Camping
Percolator coffee is the camper’s brew of choice for a few very good reasons:
- No electricity needed: Stovetop percolators work beautifully over a campfire, propane stove, or grill.
- Durable & rugged: Made from stainless steel or enamel, camping percolators are built to take a beating.
- Big batch friendly: Brew enough for the whole crew in one go.
- Nostalgia hit: There’s something deeply satisfying — and a little cinematic — about watching your coffee perk over a crackling fire.
Fun Variations and Hacks
- Add spices or flavorings: Try a cinnamon stick or a few cardamom pods in the grounds for a spiced twist.
- Cold brew with a percolator? Not really, but you can experiment with adding ice after brewing to enjoy an iced coffee.
- Use it as a hot water dispenser: After brewing, keep hot water in the percolator to refill your cup or make tea.
Is the Percolator Right for You?
The coffee percolator might seem old-fashioned, but it’s a reliable way to brew bold, no-nonsense coffee with a dash of nostalgia. It’s perfect if you:
- Love strong, full-bodied coffee
- Want a brew method that works off the grid
- Appreciate classic kitchen gear and retro vibes
If you want more control and cleaner flavors, a pour-over or drip machine might be your jam. But if you want a bit of history, a bit of adventure, and a whole lot of rich coffee, a percolator could be your next favorite coffee companion.